PC gaming is all about customization and with Modern Warfare, Infinity Ward is delivering the most robust set of customization options ever seen in a Call of Duty® PC game. Infinity Ward’s goal is to allow each player to tailor their gameplay experience to their individual playstyle. This ranges from a variety of graphics settings so you can find your perfect balance between graphical fidelity and framerates, as well as expansive customization so you can control the game exactly how you want to.
(To learn more about the minimum specifications needed to run the game, click here.)
You also have an exceptional breadth of options to control your character in Call of Duty: Modern Warfare, with countless tweaks, configuration changes, sensitivity toggling, and masses of other minor elements to finely tune. Here, we’ll offer a quick check of the different settings you can fiddle with, most of which can be changed before and during gameplay. Plus, we’ll go over all the basic controls and features of your heads-up display (HUD).
For the PS4 version of this guide, go here.
For the Xbox One version of this guide, go here.
Heads Up Display: Information from the Field of Battle
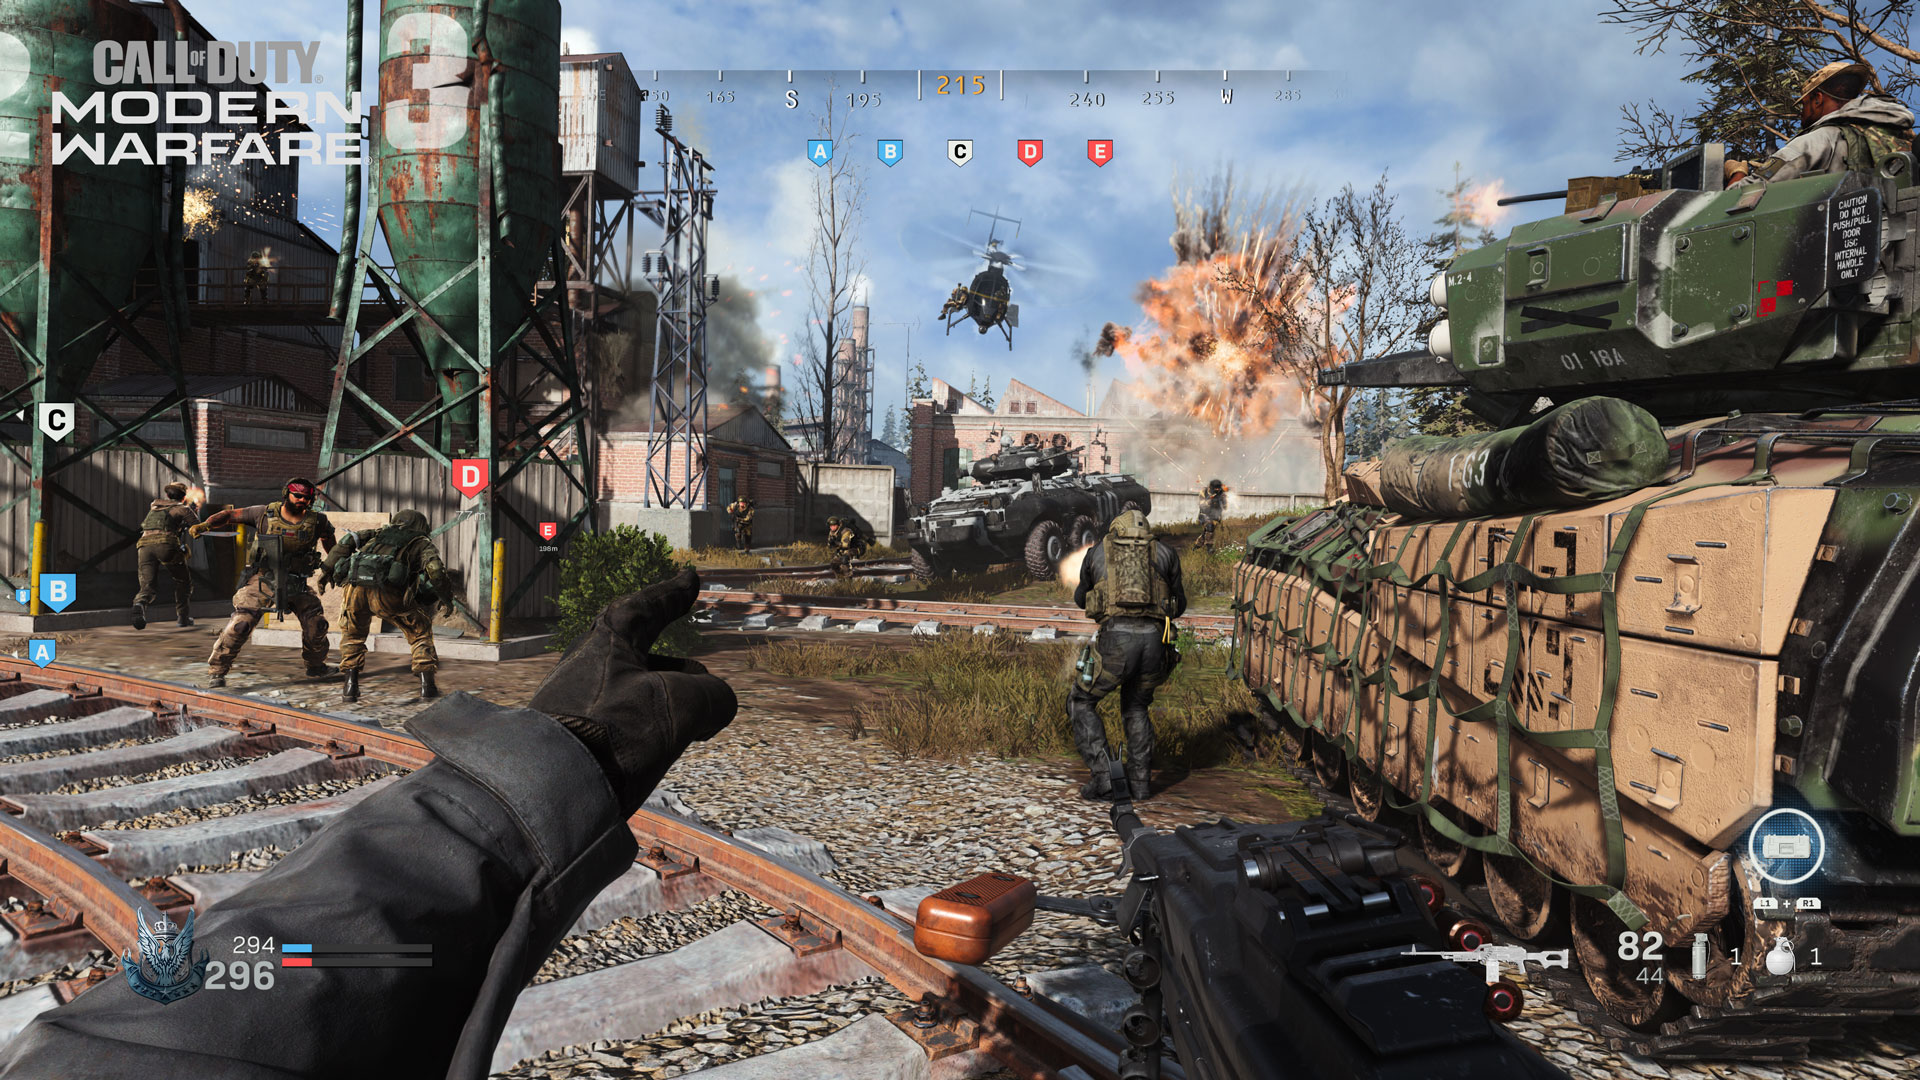
The image above shows an example of the in-game HUD, specifically, the HUD you would see in a Multiplayer match (PlayStation® 4 version shown). The different elements of the HUD, not all of which are shown in this example, provide quick, important, and tactical data that you must learn and utilize as you grow as a player. Here’s a brief look at what appears on-screen:
Compass (Top Middle): Offering complete 360-degree information, with the precise degree you’re facing shown in a yellow/brown color in the middle of the compass. Numbers change to compass directions within five degrees of 0 (North), 45 (Northeast), 90 (East), 135 (Southeast), 180 (South), 225 (Southwest), 270 (West), and 315 (Northwest). Other markers may appear here including, but not limited to, red marks to show where enemies are firing from, or markers that show the general direction of objectives.
Crosshairs (Center): Display the location your weapon will fire at or in short your precise aim and it varies depending on the weapon you’re employing. Variabilities also exist due to hip-firing, ADS, or moving about.
Weapons Detail (Bottom Right): This gives immediate knowledge of the weapon you’re currently holding, the chamber and total ammunition (which may change color to yellow/brown to indicate you’re using specialized rounds), and the type of firing option you’ve selected for your weapon (if applicable). In addition, your tactical and lethal equipment, along with the number carried, are also prominently displayed.
These next two features of the HUD may change depending on game mode:
Faction, Score, and Timer (Bottom Left): In Multiplayer, this is where the emblem of the Faction your Operator belongs to (either Coalition or Allegiance) is shown, along with pertinent scoring data, and a timer if the Multiplayer game has a countdown.
In Special Ops, this is where your teammate’s names and health will appear.
Killstreaks/Munitions (Bottom Right): In Multiplayer, this is where icons of the three Killstreaks you’ve chosen, along with a dotted line showing how many kills are necessary to access the Killstreak, are shown. In addition, when a Killstreak is recharging, the chosen Killstreak, and a progress bar, are shown in this area. In Special Ops, this is where your chosen Munitions will appear.
Lastly there is other HUD information that isn’t always displayed on your HUD:
Additional HUD Intel: This is information that will only appear in certain situations and won’t always be on your HUD. For example, a reload prompt will come up when you’re low on bullets in your chamber. In addition, expect other icons to appear, indicating in-game action commands such as mantling when there are objects you can mantle over, or areas you can mount your weapon to (while holding down the aim/ADS trigger). Status on capturing an objective also appears will appear on the HUD. The display location can vary, but typically this type of information will appear on the center of your HUD.
Gaining Complete Control
When using a keyboard and mouse in Modern Warfare on default settings, these are the keybinds that have the following basic commands (these commands can be all be re-bound to keys within the Settings menu):
W, A, S, D – Movement: Use these keys to move forward (W), left (A), backwards (S), and right (D).
F – Use: If you need to access a context-sensitive object (like opening a door instead of charging through it), press this key.
Space – Jump/Stand/Mantle: Jump across gaps, mantle over lower objects such as barriers or window sills, and climb certain scenery using this button. The depth of your jump may be influenced by your speed. You can also use this button while crouching or prone to stand up.
C – Crouch/Slide: When moving under normal circumstances, you tap this button to crouch. If you’re Sprinting and hold this button, you’ll Slide into a Crouch.
Left Ctrl – Prone: Tap this key to go Prone, lowering your center of gravity in order to do actions such as crawling under objects.
Left Shift – Sprint/Tactical Sprint/Change Zoom: If you’re maneuvering, press this while you move to Sprint, or tap twice quickly while moving to Tactical Sprint (which causes you to move more quickly than a Sprint, but with your weapon pointed up and held in one hand, lengthening the time it takes to aim and engage the gun). If you’re using a scoped weapon, this toggles the magnification of the weapon when looking through the scope itself.
Mouse – Aim/Look: Move the mouse around to have your character look around or aim a weapon.
Left-Click – Fire Weapon: This expels projectiles from your weapon’s chamber. Pay attention to your weapon’s firing mode – single, burst, or fully-automatic – as you may need to click multiple times to keep firing.
Right-Click – Aim Down Sight: This pulls the view in slightly, removes or lessens your target reticle.
R – Reload: Low on Ammo? Press this button to Reload a weapon.
1 or Mouse Wheel Up – Next Weapon: Swap to your next weapon by either pressing the 1 key or rolling the Mouse Wheel Up.
2 or Mouse Wheel Down – Previous Weapon: Swap back to a previous weapon by either pressing the 2 key or rolling the Mouse Wheel Down. Depending on settings, using the Next or Previous Weapon commands will “wrap” weapon selection around or stop at the first and last weapons in a loadout.
Mouse Button 4 or Z – Mount: Press this to mount a weapon if you’re close to a wall, window sill, or other scenery that allows this.
B – Alternate Fire: Utilizing this function when using a weapon that offers multiple firing modes – i.e. an Assault Rifle that has both fully-automatic and burst fire modes – changes the fire mode of that weapon.
Mouse Button 5 or E – Melee: Pistol whip, strike, or otherwise bludgeon a foe at close quarters with the Melee attack or hold to attempt an execution when attacking an unsuspecting foe from behind. You can also melee doors open, too.
G or Mouse Wheel Press – Lethal Equipment: This utilizes the lethal equipment from your Loadout; which ranges from mines to C4, to a throwing knife, to a good old-fashioned Frag Grenade.
Q – Tactical Equipment: This utilizes the tactical equipment from your Loadout; usually a non-lethal grenade, but a Stim or Heartbeat Sensor are also options.
N – Night Vision Goggles: Holding the button engages and disengages your NVGs (Night Vision Goggles), where appropriate, on applicable maps and modes.
X – Use Field Upgrade: When your in-game Field Upgrade, i.e. a Trophy System or Stopping Power Rounds, is fully charged, press this key to activate it.
3/4/5/6/K– Killstreak / Munitions: These buttons all engage a Killstreak in Multiplayer, or Munitions in Special Ops, in the first, second, third, and fourth slots, respectively. The last button opens a radial menu where you can select a Killstreak / Munitions, if you have more than one available.
Tab – Scoreboard/Objectives: Tap this to check the scores for yourself, your team, and your rivals, as well as other pertinent data relating to the particular Multiplayer or Special Ops game mode, or the Campaign mission objective, in question.
F3/F2 – Pause/Dismiss Pause Menu: The former button brings up your pause menu. In certain Multiplayer game modes, a mini-map is displayed in the center of the screen, along with icons of your teammates, and other informative data. In addition, you can access Social options, change your Loadout in Multiplayer or Special Ops (which takes effect after your next death), and enter the robust Options menu to change every aspect of control scheme. The latter button dismisses the pause menu.
Speaking of Options…
An Overview of Options
Call of Duty: Modern Warfare has a slew of customization settings to make the game feel comfortable in your hands. Whether it’s keybinding options, field of view sliders, or advanced graphics settings, you’ll have plenty of options to create the best PC experience for you.
Below are just some of the exclusive settings available to keyboard and mouse users across all platforms, followed by the PC-specific options:
Keyboard & Mouse Options:
Mouse and Movement
Under this submenu are three sections, starting with a few different options that pertain to just Mouse controls:
First is Mouse Sensitivity. You can have different sensitivity settings for different situations such as Ground Vehicles, Air Vehicles, and Tablet Sensitivity within the Advanced menu.
Sensitivity settings can be further refined with two options for how ADS Mouse Sensitivity is handled: Legacy, which makes rotation speed feel faster when Aiming Down Sights, or Relative, which uses an improved mouse algorithm to match mouse movement with on-screen movement without being affected by field of view. This is very useful for training muscle memory to learn the exact mouse movement needed to hit a certain location on screen. You can even set different sensitivity multipliers for Rifleman and Marksman Scopes, as well as ADS Sensitivity Transition Timing, which allows you to change when sensitivity multipliers are applied while transitioning to an ADS view. The other option here, Monitor Distance Coefficient, allows you to define a monitor distance that can be reached with an identical mouse movement at any zoom level. For example, the default value, 1.33, equates to 75% of a 16:9 monitor. With a value of 0, you will notice that you need more mouse movement to aim at a target near the boundaries of the screen than at a target closer to the reticle.
Mouse Acceleration is also customizable, letting you adjust the acceleration factor or completely disable it. There are also toggles for Mouse Filtering and Mouse Smoothing, both which can be disabled, to give you true 1:1 input for pixel perfect precision.
In order to give you even more control over your actions, there are four different Behaviors you can toggle: Automatic Airborne Mantling will climb ledges without an additional keypress, slide can be toggled between a hold or quick tap, crouching and going prone can be set to hold, toggle or go-to, and sprint and tactical sprint behavior can be customized.
Rounding out the Movement menu is Keybinds. Every single basic movement control can be changed to a different key from the default. There are also Keybind options for Weapon and Vehicle & Killstreak Controls. Essentially, if a command is mapped to a button on the mouse or keyboard, it can be re-mapped in Modern Warfare.
Weapon
The main submenu under here is for Behaviors. You can change whether a weapon automatically switches when trying to fire with no ammo (Depleted Ammo Weapon Switch), and set Aim Down Sight (ADS), and Equipment activation behaviors as toggles or holds. There’s also a variety of options for Weapon Mount Activations so you can change the keybind and activation to best suit your playstyle.
There are a few other settings here for keyboard and mouse users to really fine tune how actions in the game behave:
Switch Weapon Minimum Delay: Set the minimum time in milliseconds before it is possible to switch weapons again. Low values will help quickly switch weapons twice to cancel actions at the cost of it being more difficult to switch weapons with the mouse wheel. This setting is particularly helpful if you have a very fast scrolling mouse wheel. The trade-off is more about consistency. If the value is too low, you might switch weapon and cancel it. Having a slight delay makes weapon switch more consistent with mouse wheel, but a high delay will make it harder to cancel it.
Weapon Switch Wrap-Around: When enabled, weapons will cycle on a loop when switching through them. When disabled, the next weapon button will switch weapons until you are holding the last equipped weapon with no wrap around, and previous weapon commands will end with your first equipped weapon. This is an option if you prefer Previous Weapon to always grant you your Primary and Next Weapon to grant you your Secondary weapon. Basically, pressing multiple times previous will stop at the first weapon.
Weapon Mount Exit Delay: Sets the amount of milliseconds a directional input must be held before being registered to exit Weapon Mounting. This delay requires that the Weapon Mounting Movement Exit option is set to Enabled. This is particularly useful for players who like to quickly enter and exit Mounting. By default, you need to hold a directional input for a minimum delay before the mounted weapon is detached.
Vehicle & Killstreaks
Here you can rebind keys for vehicle movements as well as the menu navigation keys.
Interface & Audio
Other than a few more Keybinds, this submenu deals with what type of command is needed to show the Scoreboard and Objectives (a Toggle or Hold), and the System Key Behavior.
Display
The Display menu is where you’re going to find the main settings that will impact how the game is displayed and how objects on screen are rendered. In this section, you can select the game’s Display Mode (Windowed, Borderless Window, or Fullscreen), Display Monitor, Screen Refresh Rate, Render Resolution, Aspect Ratio, turn on V-Sync, and set a custom Framerate Limit for both Gameplay and Menus if you’re so inclined. If you leave these values off (set “Custom Framerate” to “Disable”), Modern Warfare will run at an uncapped framerate, limited only by your rig’s hardware.
Rounding out this subsection is the option to select a Display Gamma and switch between GPU (Display Adapters).
Details & Textures
These are the first set of settings that will let you balance visuals with framerate. You can select the quality of Texture Resolution, Texture Filter Anisotropic (surfaces when viewed at an angle), Particle Quality, Bullet Impacts, and Tessellation. Changing these settings will have a different impact on different GPUs. Modern Warfare will automatically adjust these to their ideal settings based on your GPU the first time you start the game, but you can always adjust them later to fit your preference.
Shadow & Lighting
This submenu allows you to tinker with Shadow Map Resolution, Shadow Caster Levels, the ability to Cache Spot Shadows and Sun Shadows results, Ambient Occlusion, and Particle Lighting. Warning: Some of these options use a significant amount of video memory when enabled and will have a substantial performance impact on certain GPUs. Modern Warfare will automatically adjust these to their ideal settings based on your GPU the first time you start the game, but you can always adjust them later to fir your preference.
Post Processing Effects
This is where you can adjust Anti-aliasing, Filmic Strength, or the amount of temporal blurring vs. image stability when anti-aliasing, and the amount of Film Grain on screen.
General Options:
Screen
Field of view is one of the most requested graphical options. With Modern Warfare, the team wants to make sure the game looks great on the widest variety of hardware, from the smallest monitor to a huge ultra-ultra-wide display.
Each weapon has its own zoom level. With the ADS field of view set to independent, the weapon ADS will override your field of view settings. With the value set to relative, the weapon will scale the field of view based on your settings. This is very useful for players playing on very high field of view as it will limit the FOV transition when ADS. As for horizontal and vertical HUD bounds, this is where you can adjust the horizontal and vertical margins of your heads-up display to better fit your screen.
Accessibility: Aside from subtitles and language selections, we have two separate adjustments for colorblind gamers: You can choose the colorblind type (none, protanopia, deuteranopia, or tritanopia), which changes the color of various interface elements to match your type. You can also apply a colorblind target filter over the entire game world, the HUD interface, or everything on the screen. Below this, there is the ability to disable or enable world motion blur (the simulated blurring of moving objects), and weapon motion blur (the blur effect when the camera or objects are moving rapidly).
Content Filters: Here, you can enable or disable text chat, the profanity filter within text chat, and dismemberment and gore effects on character models.
Telemetery
While fine tuning your settings, you’re going to want some feedback on how the changes are affecting your framerate. In this menu you can add some of that important telemetry to your HUD including the FPS counter. You’ll also be able to turn on indicators for server latency, muted sounds, and voice chat so you can easily tell what’s muted when using the mute hotkeys (F9 for master audio and F10 for voice chat). The indicators for muted sounds and voice chat is a new feature this year: To avoid hitting these buttons by mistake, a telemetry widget has been added to the top of the screen to remind you, in case you disabled any of these options. The sound and voice chat telemetry widget allows you to remove these notifications to reduce visual noise.
Audio Options
Volumes: Just like the customizations for graphics and controls, Modern Warfare allows you to adjust the audio mix to best suit your gaming preferences. Check out Infinity Ward’s blog for more details.
Voice Chat: Separate to all the other Volume options, this is where you can adjust voice chat volume, microphone volume, and open mic recording threshold.
Account Options
Online: This is where you can turn crossplay and crossplay communication on and off, display unique ID numbers on player names, and view your COD account.
Network: This section has four options for advanced users: the connection meter (a near real-time measurement of ping and packet loss in-game), geographical region, external IP address, and internal IP address. We highly advise leaving the last three options hidden if you visit this menu while live streaming, taking screenshots, or doing video capture.
That essentially wraps up all the controls and settings within Call of Duty: Modern Warfare. While this guide may have helped answer a few questions, it’s best to experience the game for yourself and follow in-game instructions. Otherwise, check out Activision Support for any further questions.
For more information and the latest intel on Call of Duty®: Modern Warfare®, check out: www.callofduty.com, www.youtube.com/callofduty and follow @InfinityWard and @CallofDuty on Twitter and Instagram and Facebook.
For more information on Activision games, follow @Activision on Twitter, Facebook, and Instagram.