“Well, smile for the cameras and don't miss... Shepherd's gonna be watching. Best shooter gets to join the prima donna squad... if that's your thing.” Corporal Dunn, Call of Duty: Modern Warfare 2.
Season Two brought in four new Trials experiences, including one that brings Behind Enemy Lines to a new map. If you made the Officer Ranks before, you may have already experienced Trials, tests of skill that allow you to earn thousands of XP in only a few minutes.
At launch, there were three Trials to take part in: the Gun Course, Behind Enemy Lines, and Marksman Challenge. Soon after in Season One, a few new Trials were added: Risky Parkour, Heavily Armed, and Shooting Range.
In Season Two, you can choose to play any of these Trials again, or choose from the four new ones – which have variants, totaling nine new experiences.
Just one Trial ticket will allow you three tries at the best time in each Trial, with a three-star ranking giving you 10,000 XP.
If you equip a Double XP token, and have purchased the Battle Pass which give a 10% XP bonus, you could get a major XP reward. In other words, that three-star reward could be worth a whopping 22,000 XP with both bonuses active, and if you know your way around these Trials, that XP boost can come in only a few minutes of your time.
How can you earn that three-star rating in all the new Trials efficiently? You’ve come to the right place; ready up and read up on these tips for Fire in the Hole, Quad Race, Price’s Alley, and Behind Enemy Lines on Gun Runner:
Fire in the Hole
Practice your throwing skills with lethal equipment and reach as many targets as possible before time runs out.
In either version of this Trial, you’ll be tasked at throwing Grenades though targets on the Training Range.
These targets – cutouts of doors and windows, along with a truck and a small wooden shack to your right – have a stoplight just above them. Green means ready to throw, and red means grenades have already been tossed through.
Next to or above each structure is the point value for those targets and, after you successfully throw a grenade through a target, you’ll get a quick score pop-up showing what that target was worth.
The first version of the Trial gives you a full minute to throw Frag Grenades through as many targets as possible. You must get 3,250 points to earn a three-star rating and all targets are available for you to throw through.
As for the other version of this Trial, which only requires 2,750 points to get a three-star rating on, only certain targets will be active. In other words, three groups of targets will be lit and unlit in 20-second periods. Targets that aren’t lit up can’t be scored on.
In either version, it’s best to use your first attempt to get used to arc of Frag Grenades. For some targets, you may have to even look towards the ceiling for it to go the distance.
Furthermore, the Training Range has a few Special Targets, which are unmarked and provide bonus score. Hint: look for items you could throw a grenade through to boost your final score.
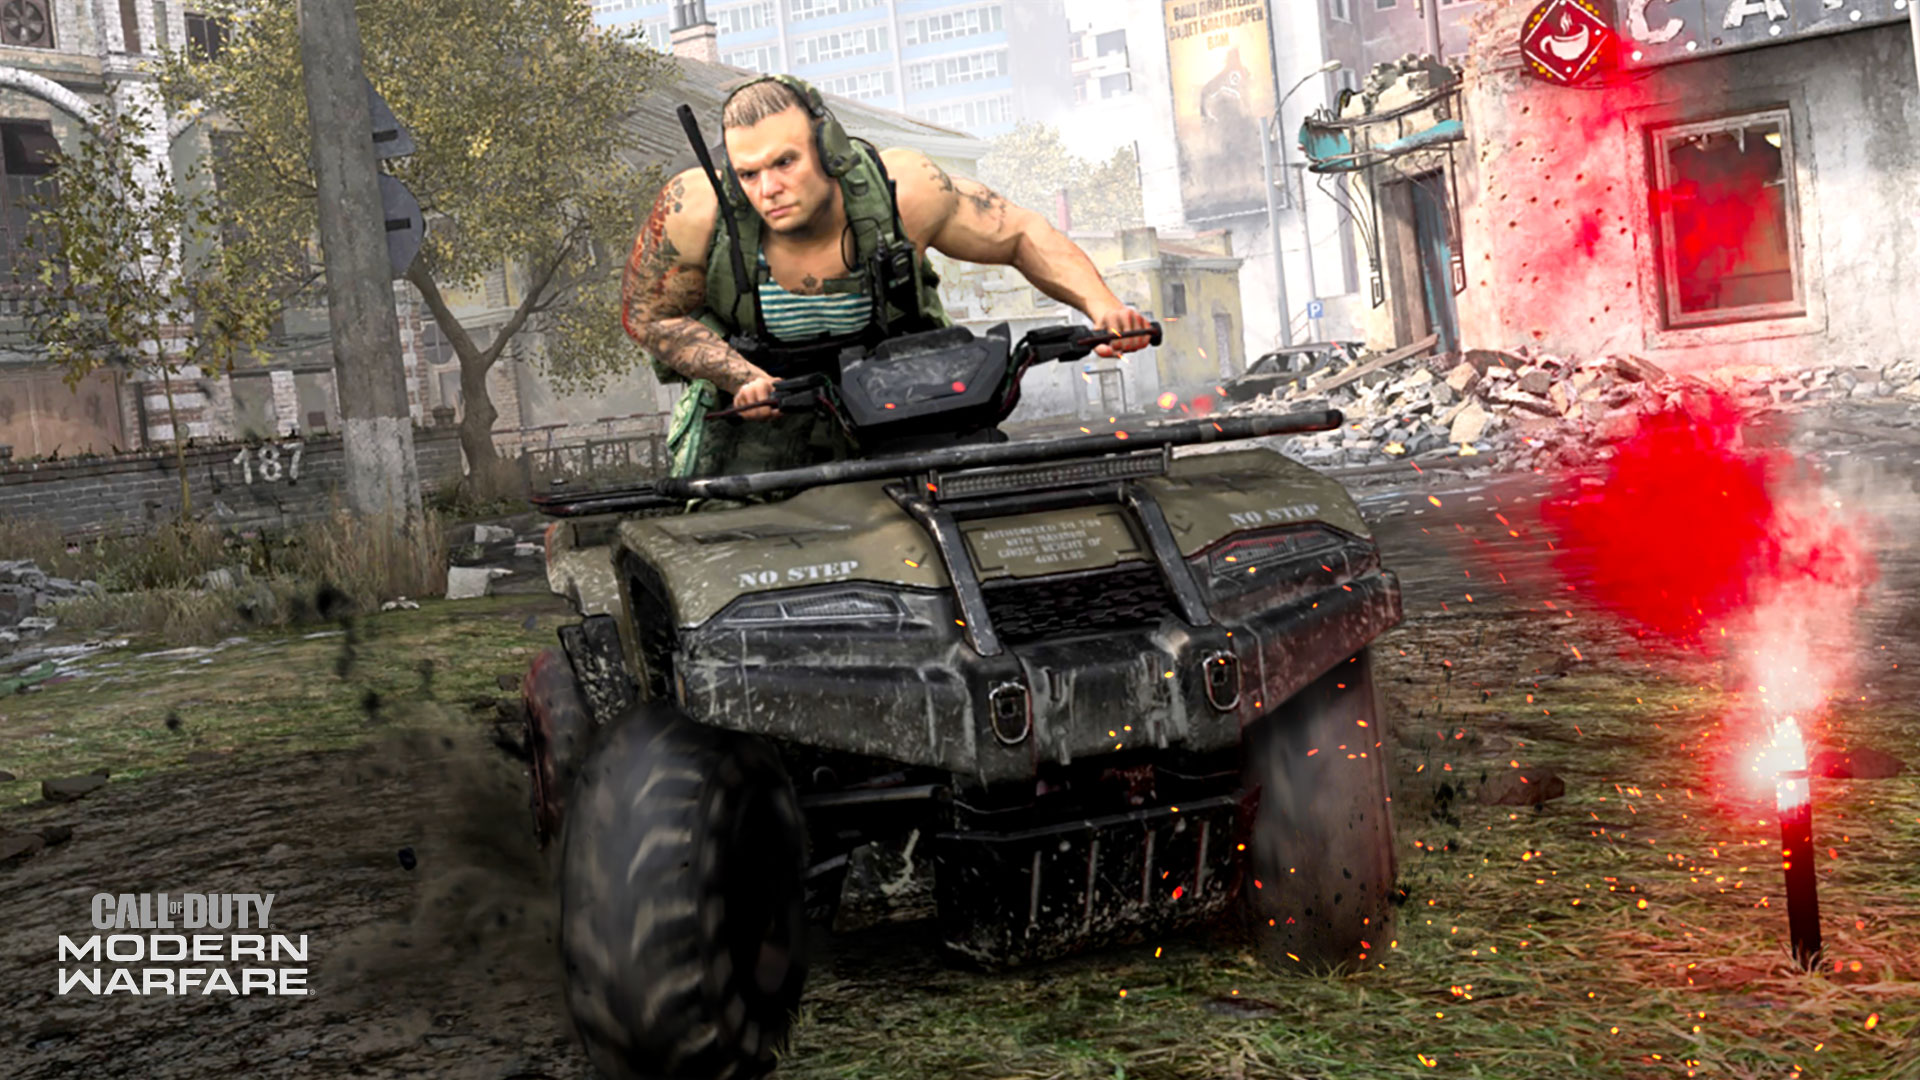
Quad Race
Finish the race as quickly as possible. Race through flares gates and finish the course as quickly as possible.
This Trial is the furthest departure from traditional gameplay, as you’ll be hopping on an ATV and driving through Grazna Raid and Aniyah Palace.
For Grazna Raid, a three-star rating requires you to complete three laps within 54 seconds. For Aniyah Palace, a time of 1:29 in three laps is needed for a three-star rating.
In terms of general tips, always remember that cutting corners is encouraged during these time trials, and don’t fret over your first lap too much; it should be the slowest of the three as you’ll have a rolling start for the next two.
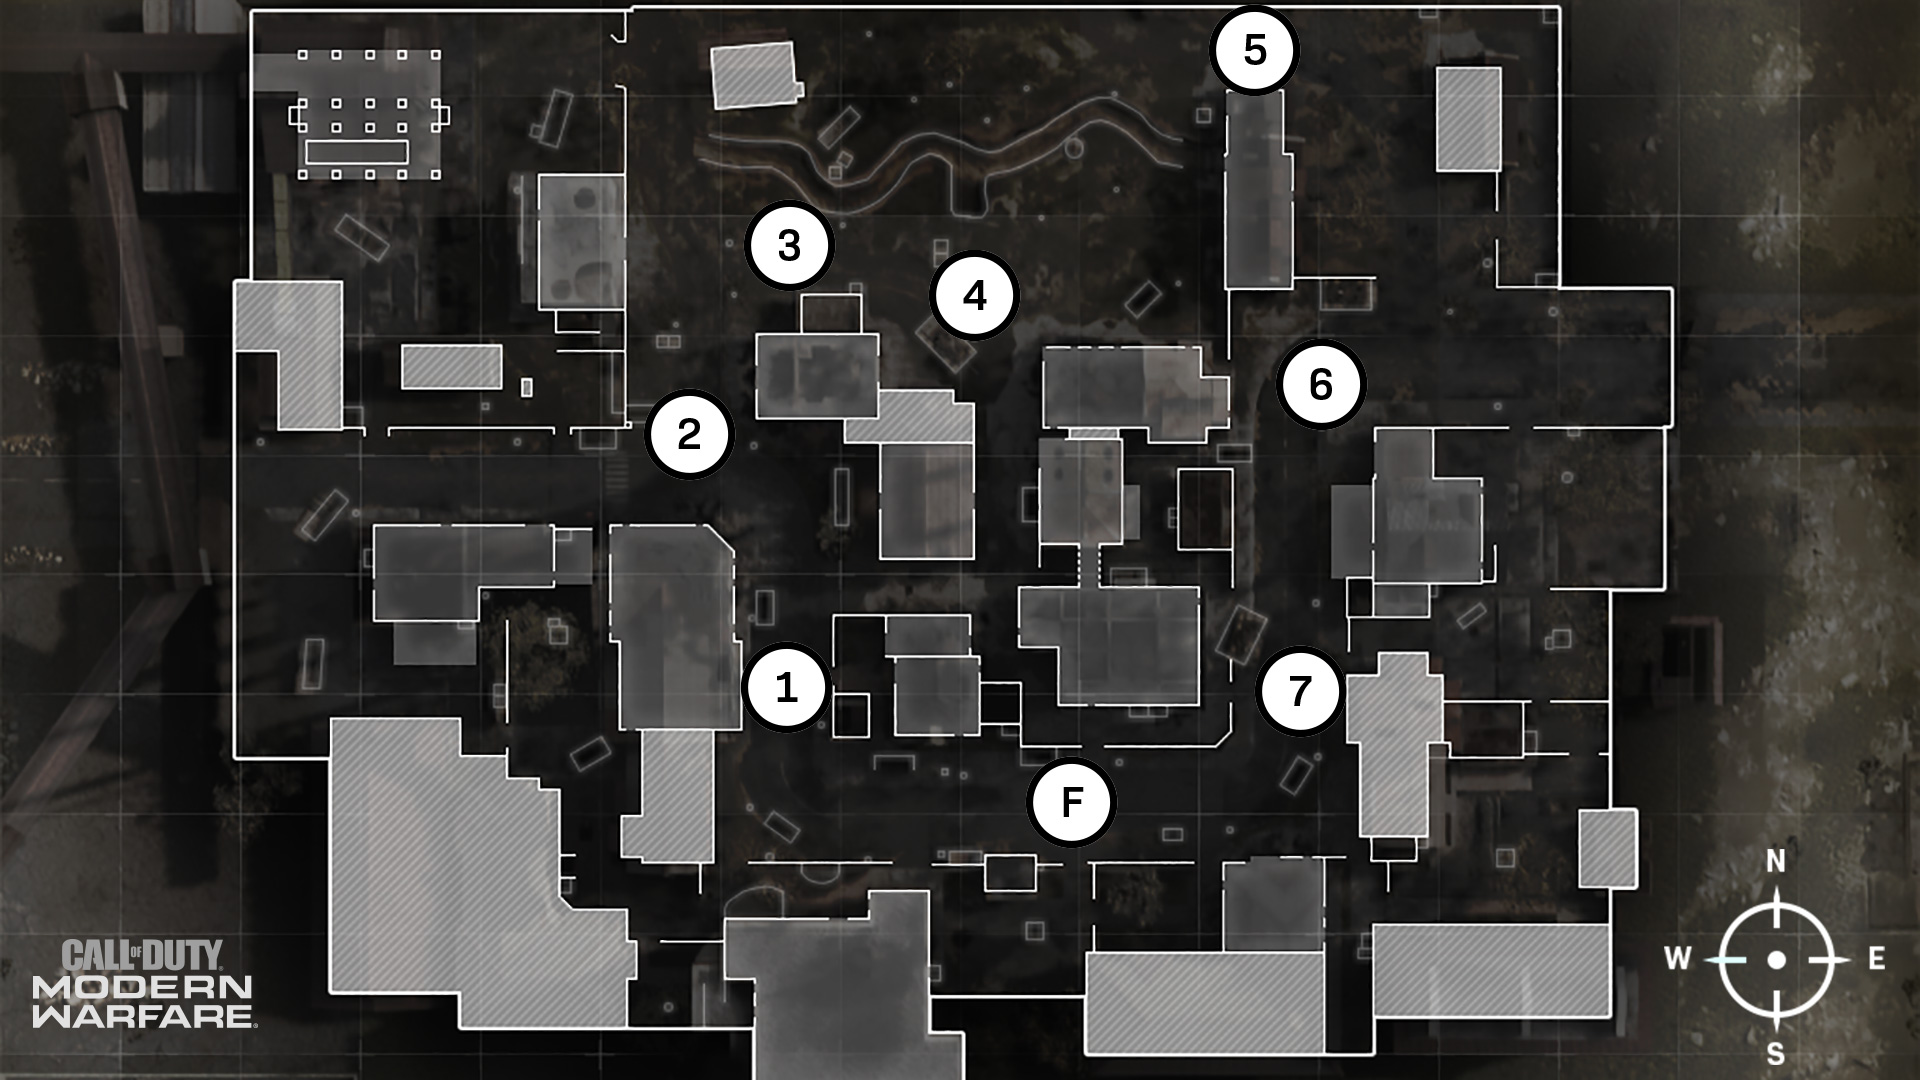
When we’re talking about racing, it’s better to show rather than tell. Look below to see the flare checkpoints, as well as our pacenotes – don’t worry, they aren’t in shorthand – and analysis of these two courses. (Note: on both maps, the “F” mark denotes the start and finish line.)
Grazna Raid:
Full Pacenotes: Straight into quick right, keep in. S-curve into square right. Straight caution then long left. Double caution into right hairpin opens.Jump or hard S-curve into straight. Square right into finish.
1: Straight into quick right, keep in.
The first curve from the start/finish line can be cut slightly by hugging the inner crest. Use that on all three laps.
2: S-curve…
From the first curve, hug the right curb and make a diagonal towards the second flare, avoiding the burnt-out car, wreckage, and building corners on the apex of each turn in the S-curve.
3: … into square right.
Analysis: This is where you want to pump the brakes slightly as you round this corner, lest you crash into the barriers blocking you from the ditch.
4: Straight caution then long left.
Avoid the boxes as you gun it right through this straightaway but be prepared to take a long left past the bombed-out building. Also don’t hit into the tree.
5: Double caution into right hairpin opens.
The make-or-break corner of the course, as you’ll go over the trench via metal plates. If you fall, it may be worth to just restart. As for the hairpin, slow down a bit before taking it, then gun it after you reach its apex.
6: Jump or hard S-curve into straight.
You may be thinking “TAKE THE SWEET JUMP” and while it looks cool, it will actually eat up seconds for your final time. Contain your excitement and take the S-curve which has a slight shortcut through the Tire Shop into the seventh flare.
7: Square right into finish.
No need to pump the brakes on this last lap: take it at the right angle, and you’ll sprint across the line to (hopefully) get that three-star rating. With a three-star time of 54 seconds, your average lap needs to be under 18 seconds.
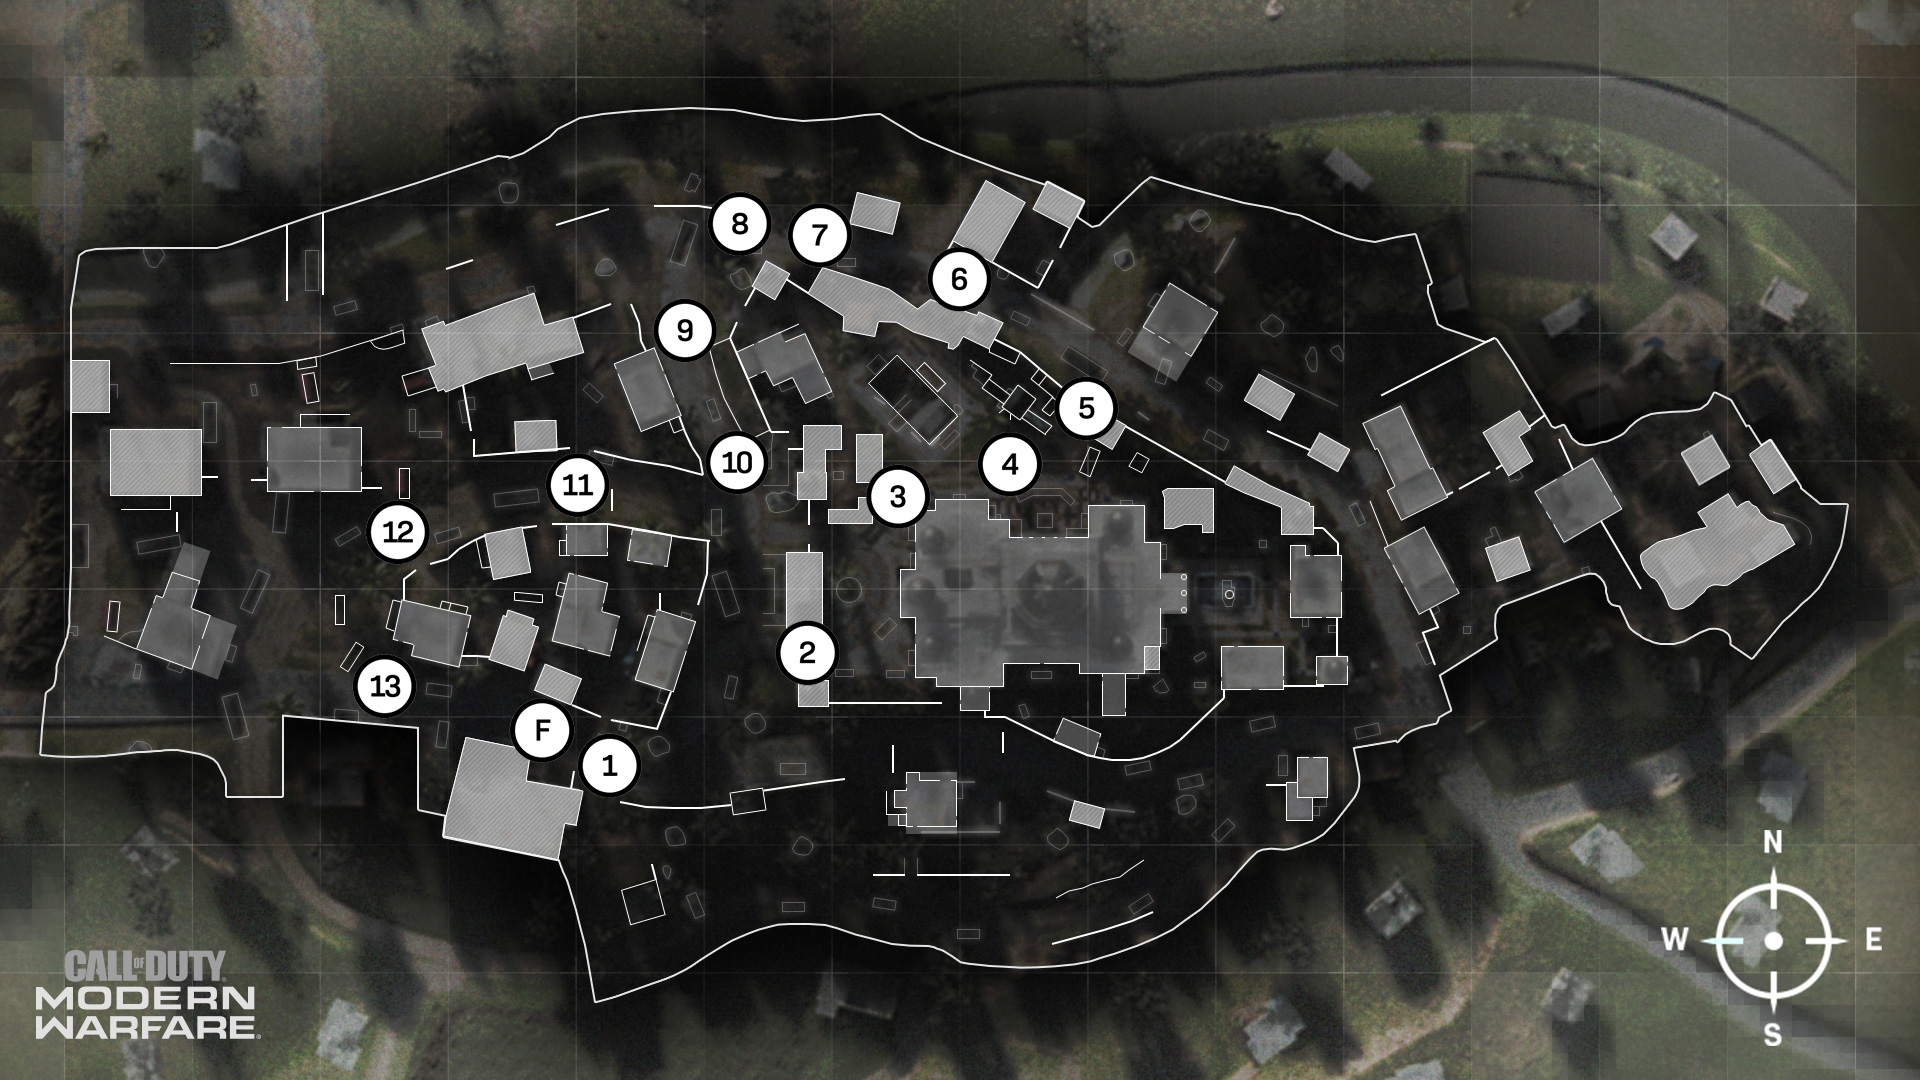
Aniyah Palace
Full Pacenotes: Straight into quick left into quick right. Crest narrows into curved left. Straight into square right. Straight then slight left into square left. Straight 80 meters. Hard left, keep out. Straight into square right, keep in. Flat-out S-curve into long harpin into finish.
1: Straight into quick left into quick right.
During the first lap, you probably don’t need to worry about speed through here, but in other laps, be prepared to tap the brakes into the first turn. On every lap, avoid the truck on the left side of the road.
2: Crest narrows into curved left.
Don’t hit the entrance to the palace as you shimmy your ATV up and through into an easy left corner.
3: Straight into square right.
This quick straightaway will help you gather speed after going uphill. Afterwards, only slightly reduce your speed to cut the corner.
4: Straight…
Build speed here before going into a prolonged harpin.
5: … then slight left into square left.
You can still use some speed to go into the first part of this turn, but slow down in front of the body shop.
6: Straight 80 meters.
Floor the petal and avoid the burnt-out cars as you zoom through this section.
7-8: Hard left, keep out.
This corner is one you can’t cut, as there is some debris blocking you. Take the shortest line possible while avoiding the obstacles.
9:Straight…
Whatever speed you lost in the last curve, make up for it here.
10: ...into square right, keep in.
Unlike the previous corner, it’s better for you to be closer to the curve’s apex rather then outside, as the upcoming obstacle is on the left side of the road.
11: Flat-out S-curve…
Technically, you can make a straight line through this at full speed, but obstacles turn this straightaway into a S-curve section. Just avoid them and get ready for this final turn.
12: … into long harpin…
While there is an actual road for this harpin, it’s almost essential to keep to the inside and take a shortcut over a hill. Try staying to the right on the S-curve, and you’ll hit this harpin shortcut easier.
13: … into finish.
Your average lap on the Palace course should be just under 30 seconds for you to hit a three-star time. A good time to shoot for on the first lap is 31 seconds, with your final two laps needing to be at a 29 second pace to equal 1:29 for the 10,000 XP bonus.
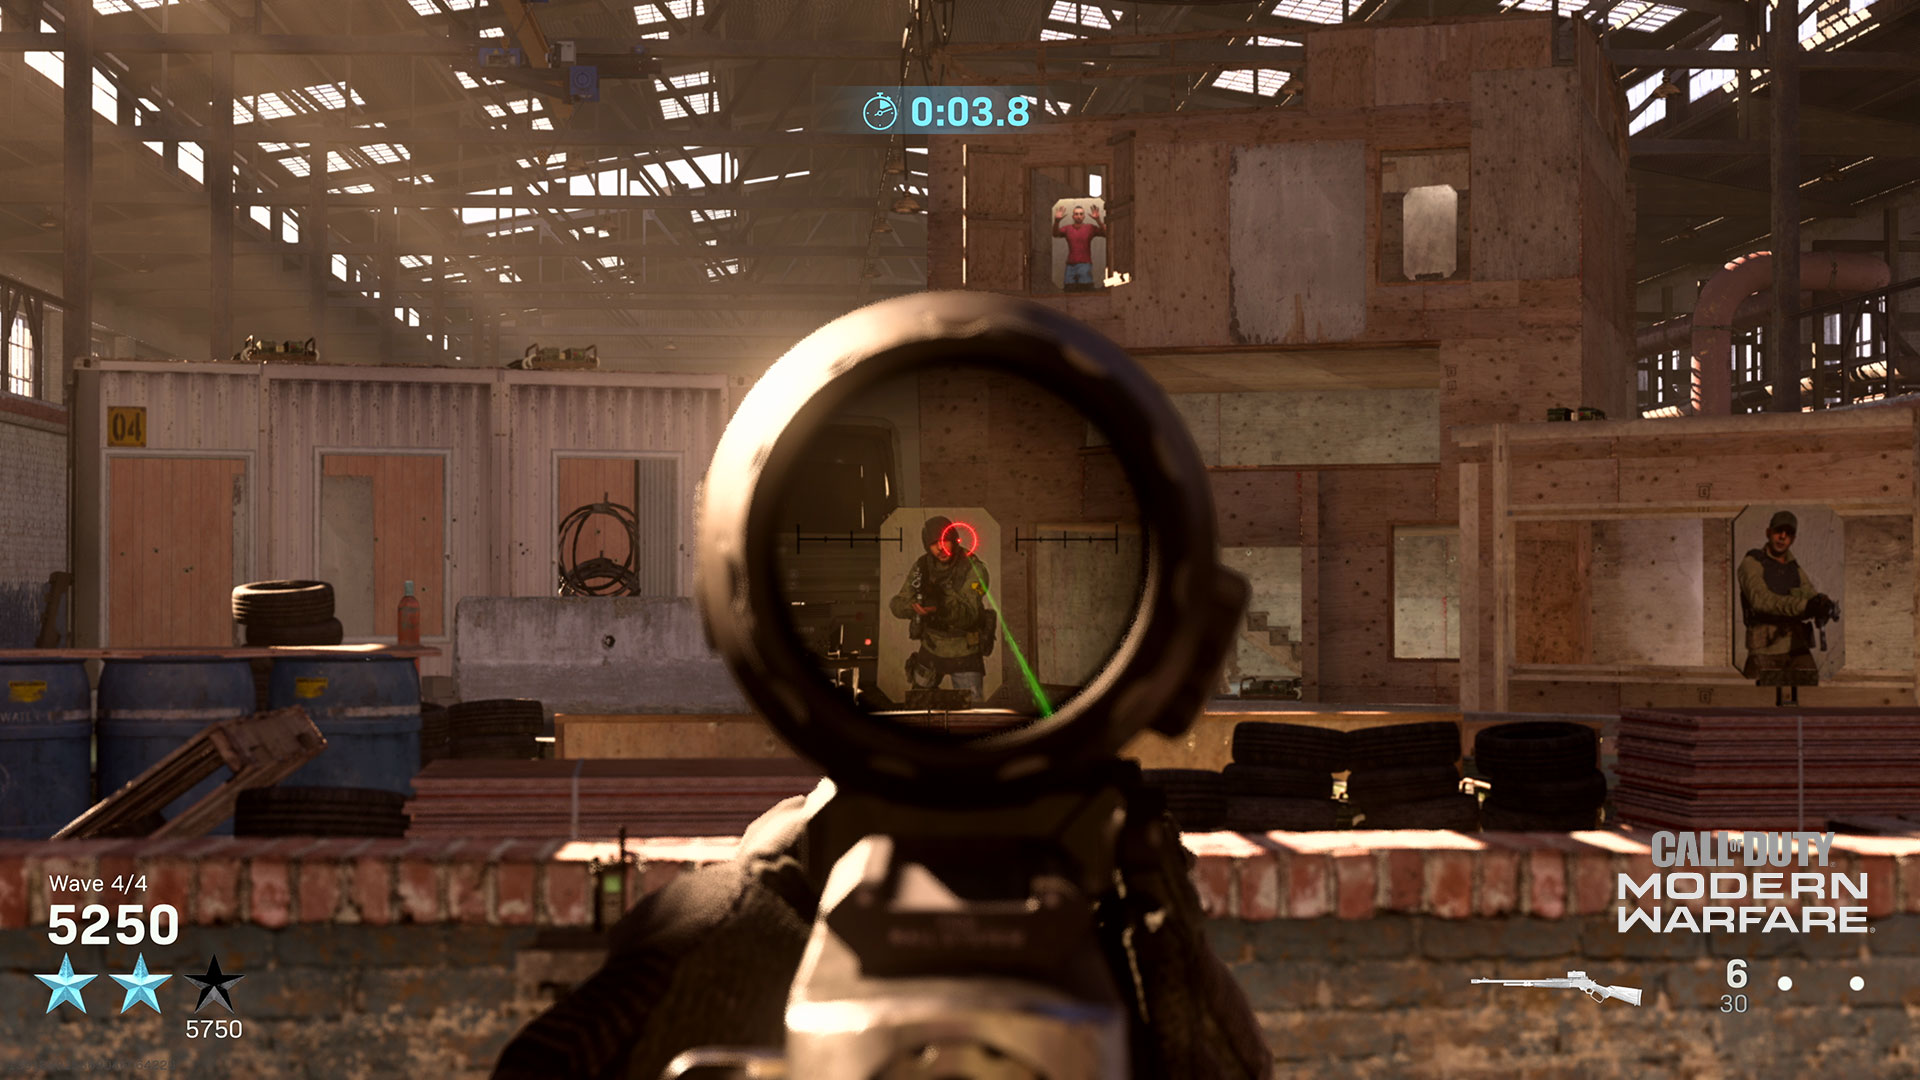
Price’s Alley
Sharpen your decision-making skills while engaging waves of mixed enemies and civilian targets.
Price’s Alley is a training shoot house that takes place on a Training Course. Unlike the Gun Course, you’ll be engaging with hostile andcivilian target cutouts from within a shooting booth.
When these targets first pop up, they will be facing away from you. Your objective is to determine which targets are friend and which are foe, then pull the trigger on the latter. After only a few seconds, targets that were not shot will pop back down, meaning that you can miss out on hitting hostile targets.
Instead of getting a final time, you will get scored based on the following criteria:
· Each enemy target hit is worth 100 points
· Each headshot on an enemy target is worth an additional 50 points (150 points total)
· Each Civilian hit takes 200 points away from your score.
o Note: Civilians can be hit via collateral shots.
· At the end of the Trial, your accuracy will also be graded on a percentage scale. Every percentage point of accuracy is worth 5 additional points onto your final score, with 100% being worth 500 extra points.
o It is possible to get a score over 100%, hence why we mention each percentage point of accuracy being worth 5 Points.
The first version of this trial, which is with a pistol, requires a score of 6,000 for a three-star rating. In the second version of this Trial, you’ll be given an MK2 Carbine with the goal of scoring 5,750 points to get a three-star rating.
In general, it’s best to take accurate shots rather than wildly shoot around the course. Furthermore, it’s worth the risk of an accuracy penalty if you’re trying to hit a hostile target as its going down.
The targets will be stationary for the first two waves of both Trials, but then move around in the last two. This is where you can get collateral kills: two targets for one bullet, which can push your accuracy over 100% if done efficiently. However, this strategy comes with risk, as you could hit a friendly target that is hiding behind a hostile one.
Behind Enemy Lines
Live fire exercise: Find and eliminate all hostiles in the A.O. as quickly as possible.
NVG ONLY: You will have limited ammo in your initial weapon and will need to scavenge for ammo and weapons through the fight.
The second version of Behind Enemy Lines takes place on Gun Runner and with three different variants: one with assault weapons, one with heavy weapons (think LMGs), and a third that’s more tactical, featuring only an M19 and taking place at night.
All three versions of this Trial require you to finish it within 1:30 for a three-star ranking. If you die during the Trial, it will count as a 0-star attempt.
For the first two variants, choose your weapon of choice and sweep through the map, using the Tac Map pings to find targets in the area. As for the night version, you won’t get far with just a sidearm, so be sure to pick up the weapons of your enemies after killing them.
Also, in all three versions of this Trial, you can technically take down your first target before the timer even starts. Just shoot through the metal fence, and you’ll only have to take down 29 targets instead of 30 when it starts!
In general, the Tactical Map Intel for Gun Runner will serve you well when trying to complete this Trial, so check it outand use your first attempt on these Trials to scout where enemies will spawn.
With these tips, we hope you achieve a 3-star ranking on each trial to gain a cumulative 90,000 XP bonus… Or 99,000 XP if you get the XP Boost from the Battle Pass… Or, if you have a Double XP Token active and the Battle Pass, a whopping 198,000 XP bonus!
Either way, share your best times with the community – especially for the Quad Race – and stay tuned for more Trials guides in the future.
We’ll see you online. Stay frosty.
For more information and the latest intel on Call of Duty®: Modern Warfare®, check out: www.callofduty.com, www.youtube.com/callofdutyand follow @InfinityWard and @CallofDuty on Twitter and Instagram and Facebook.
For more information on Activision games, follow @Activision on Twitter,Facebook, and Instagram.