You have an exceptional breadth of options to control your character in Multiplayer, with countless tweaks, configuration changes, sensitivity toggling, and masses of other minor elements to finely tune. Here, we’ll offer a quick check of the different settings you can fiddle with, most of which can be changed before and during a game. Note that we’re referring to the PC version of the game.
Heads Up Display: Information from the Field of Battle
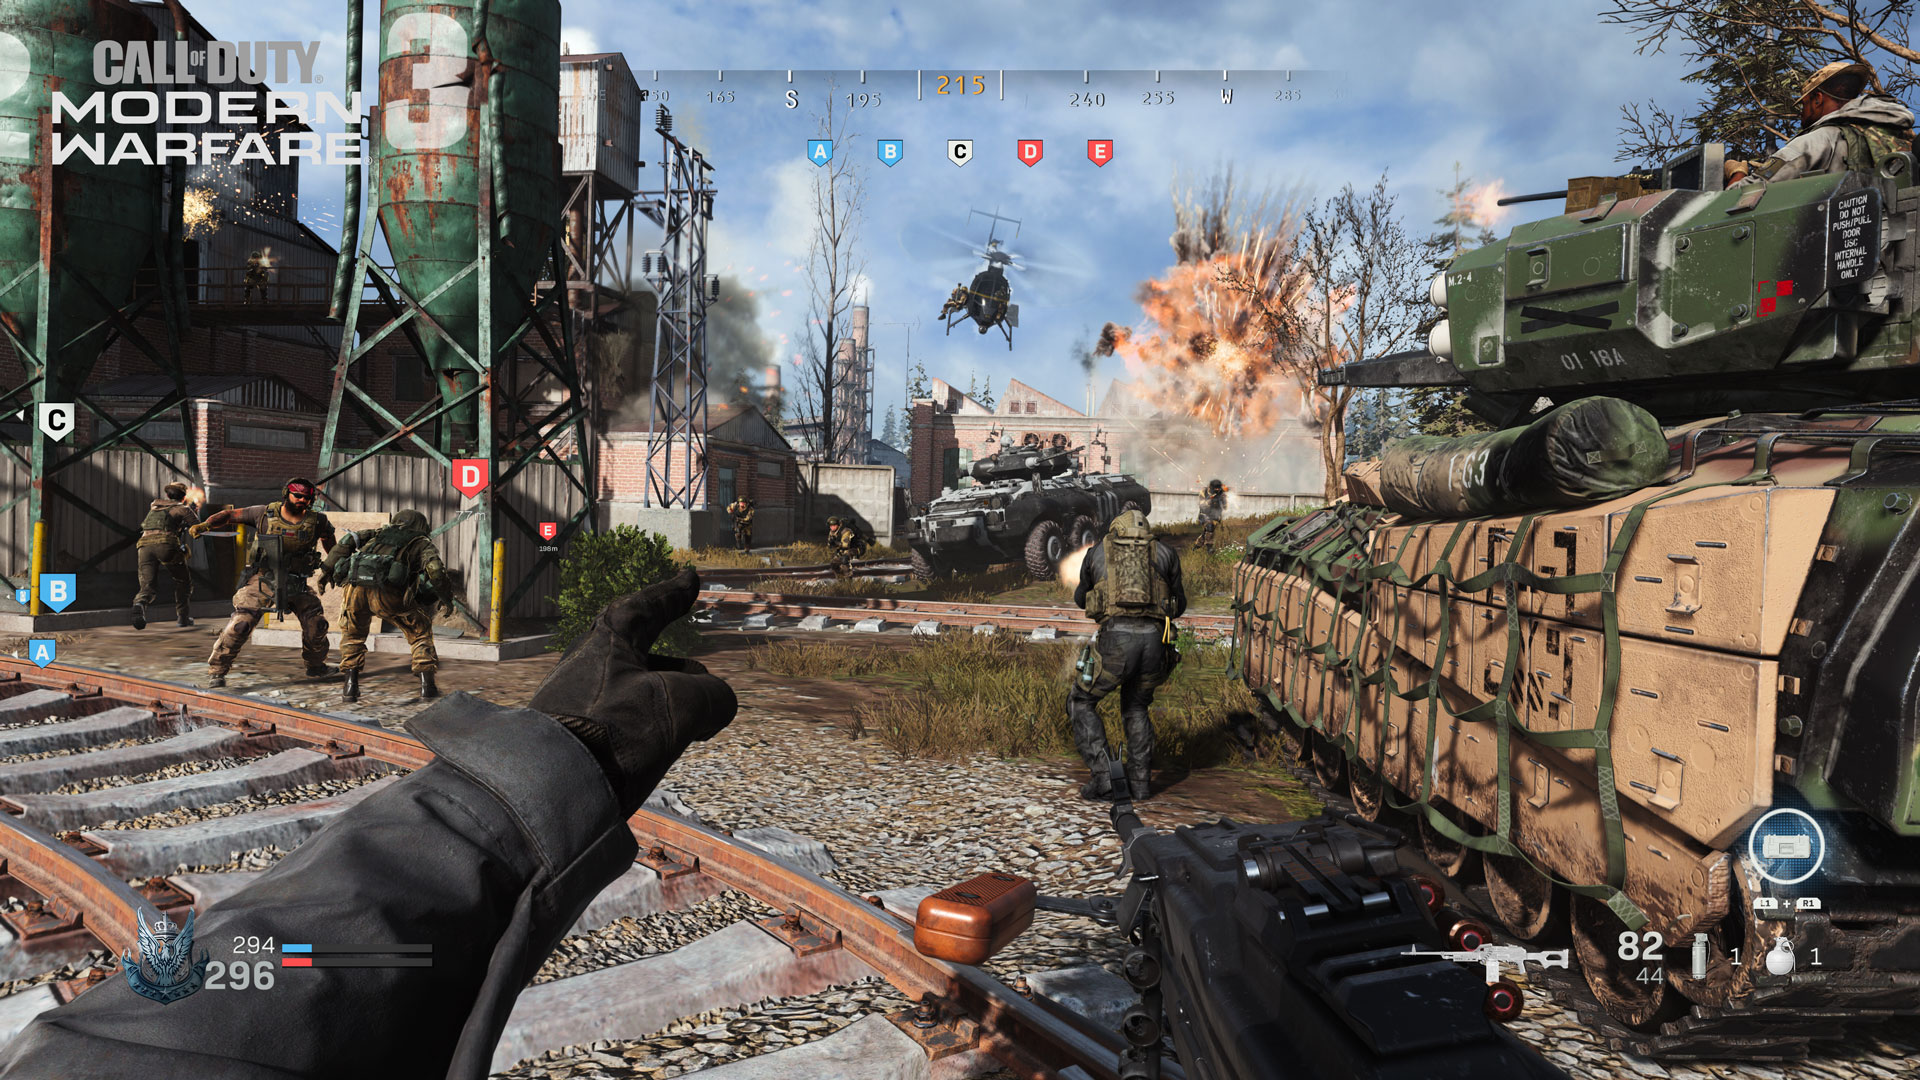
The adjacent image shows an example of the in-game HUD (PlayStation® 4 version shown). The different elements of the HUD, not all of which are shown in this example, provide quick, important, and tactical data that you must learn and utilize as you grow as a player. Here’s a brief look at what appears on-screen:
Compass (Top Middle): Offering complete 360-degree information, with the precise degree you’re facing shown in a yellow/brown color in the middle of the compass. Enemies may appear as red marks indicating their general direction, while named locations within a map also appear just under the central coordinates. Numbers change to compass directions within five degrees of 0 (North), 45 (Northeast), 90 (East), 135 (Southeast), 180 (South), 225 (Southwest), 270 (West), and 315 (Northwest).
Faction, Score, and Timer (Bottom Left): The emblem of the Faction your Operator belongs to (either Coalition or Allegiance) is shown, along with pertinent scoring data, and a timer if the Multiplayer game has a countdown.
Crosshairs (Center): Offering a wide difference of sizes depending on the weapon you’re employing, whether you’re hip-firing, ADSing, or just moving about. Expect a Reload prompt when you’re low on bullets in your chamber.
In addition, expect other icons to appear, such as scenic objects you can Mantle over, or areas you can Mount your weapon to (while holding down the aim/ADS trigger).
Killstreaks (Bottom Right): Icons of the three Killstreaks you’ve chosen, along with a dotted line showing how many kills are necessary to access the Killstreak, are shown above your weapon iconography. In addition, when a Killstreak is recharging, the chosen Killstreak, and a progress bar, are shown in this area.
Weapons Detail (Bottom Right): This gives immediate knowledge of the weapon you’re currently holding, the chamber and total ammunition (which may change color to yellow/brown to indicate you’re using specialized rounds), and the type of firing option you’ve selected for your weapon (if applicable). In addition, your Tactical and Lethal equipment, along with the number carried, are also prominently displayed.
Gaining Complete Control
When using a Keyboard in Modern Warfare on default settings, these are the keybinds that have the following basic commands (these commands can be all be re-bound to keys within the Settings menu):
W, A, S, D – Movement: Use these keys to move forward (W), left (A), backwards (S), and right (D).
F – Use: If you need to access a context-sensitive object (like opening a door instead of charging through it), press this key.
Space – Jump/Stand/Mantle: Jump across gaps, mantle over lower objects such as barriers or window sills, and climb certain scenery using this button. The depth of your jump may be influenced by your speed. You can also use this button while crouching or prone to stand up.
C – Crouch/Slide: When moving under normal circumstances, you tap this button to crouch. If you’re Sprinting and hold this button, you’ll Slide into a Crouch.
Left Ctrl – Prone: Tap this key to go Prone, lowering your center of gravity in order to do actions such as crawling under objects.
Left Shift – Sprint/Tactical Sprint/Change Zoom: If you’re maneuvering, press this while you move to Sprint, or tap twice quickly while moving to Tactical Sprint (which causes you to move more quickly than a Sprint, but with your weapon pointed up and held in one hand, lengthening the time it takes to aim and engage the gun). If you’re using a scoped weapon, this toggles the magnification of the weapon when looking through the scope itself.
Mouse – Aim/Look: Move the mouse around to have your character look around or aim a weapon.
Left-Click – Fire Weapon: This expels projectiles from your weapon’s chamber. Pay attention to your weapon’s firing mode – single, burst, or fully-automatic – as you may need to click multiple times to keep firing.
Right-Click – Aim Down Sight: This pulls the view in slightly, removes or lessens your target reticle.
R – Reload: Low on Ammo? Press this button to Reload a weapon.
1 or Mouse Wheel Up – Next Weapon: Swap to your next weapon by either pressing the 1 key or rolling the Mouse Wheel Up.
2 or Mouse Wheel Down – Previous Weapon: Swap back to a previous weapon by either pressing the 2 key or rolling the Mouse Wheel Down. Depending on settings, using the Next or Previous Weapon commands will “wrap” weapon selection around or stop at the first and last weapons in a loadout.
Mouse Button 4 or Z – Mount: Press this to mount a weapon if you’re close to a wall, window sill, or other scenery that allows this.
B – Alternate Fire: Utilizing this function when using a weapon that offers multiple firing modes – i.e. an Assault Rifle that has both fully-automatic and burst fire modes – changes the fire mode of that weapon.
Mouse Button 5 or E – Melee: Pistol whip, strike, or otherwise bludgeon a foe at close quarters with the Melee attack or hold to attempt an execution when attacking an unsuspecting foe from behind. You can also melee doors open, too.
G or Mouse Wheel Press – Lethal Equipment: This utilizes the lethal equipment from your Loadout; which ranges from mines to C4, to a throwing knife, to a good old-fashioned Frag Grenade.
Q – Tactical Equipment: This utilizes the tactical equipment from your Loadout; usually a non-lethal grenade, but a Stim or Heartbeat Sensor are also options.
N – Night Vision Goggles: Holding the button engages and disengages your NVGs (Night Vision Goggles), where appropriate, on applicable maps and modes.
X – Use Field Upgrade: When your in-game Field Upgrade, i.e. a Trophy System or Stopping Power Rounds, is fully charged, press this key to activate it.
3/4/5/6/K– Killstreak: This engages a Killstreak in the first, second, third, and fourth slots, respectively. The last button opens a radial menu where you can select a Killstreak, if you have more than one available.
Tab – Scoreboard/Objectives: Tap Tab to check the scores for yourself, your team, and your rivals, as well as other pertinent data relating to the particular Multiplayer game mode in question.
F3/F2 – Pause/Dismiss Pause Menu: This brings up your pause menu. In certain Multiplayer game modes, a mini-map is displayed in the center of the screen, along with icons of your teammates, and other informative data. You can also change your Loadout manually and edit Options in-game. Dismiss this menu by pressing the latter key.
PC Settings
Those who play the Modern Warfare Beta* on a PC have a wealth of personalization options ranging from specific graphics settings to key rebinding menus.
We detailed nearly all the menus within the PC version of the Beta, as well as the minimum specifications required to run it, in an additional blog post listed in the Related Articles section (below).
Pre-Launch Intel: Additional Information and Content
Check back at the Activision Games Blog throughout the coming days and weeks for further intel. Check the Related Articles for further Call of Duty: Modern Warfare information.
Pre-orders at participating retailers are available now, or at CallofDuty.com.
*MP Beta Early Access starts September 12, 2019; Open MP Beta begins September 14, 2019 on PS4™ system. Actual platform availability and launch date(s) of MP Beta subject to change. See www.callofduty.com/beta for more details. Minimum Open Beta duration is 2 days. Limited time only, while Early Access Beta Codes last, at participating retailers. Internet connection required.
For more information and the latest intel on Call of Duty®: Modern Warfare®, check out: www.callofduty.com, www.youtube.com/callofduty and follow @InfinityWard and @CallofDuty on Twitter and Instagram and Facebook.
For more information on Activision games, follow @Activision on Twitter, Facebook, and Instagram.