Operation: Rank Up Report #0022
Day 154 – 13:21:43 PST
Somewhere in California
AGB – Lead Writer
If you haven’t maxed out your rank or Battle Pass, you still have some time left.
What do you get for reaching Tier 100 of the Battle Pass system? Well, look no further than my featured Operators for the week: for the Allegiance, we have Minotaur with his Squad Leader skin, and for the Coalition, we have Ghost in his Dark Vision gear. Those outfits are unlocked in challenges which are within Tier 90 and Tier 100 respectively.
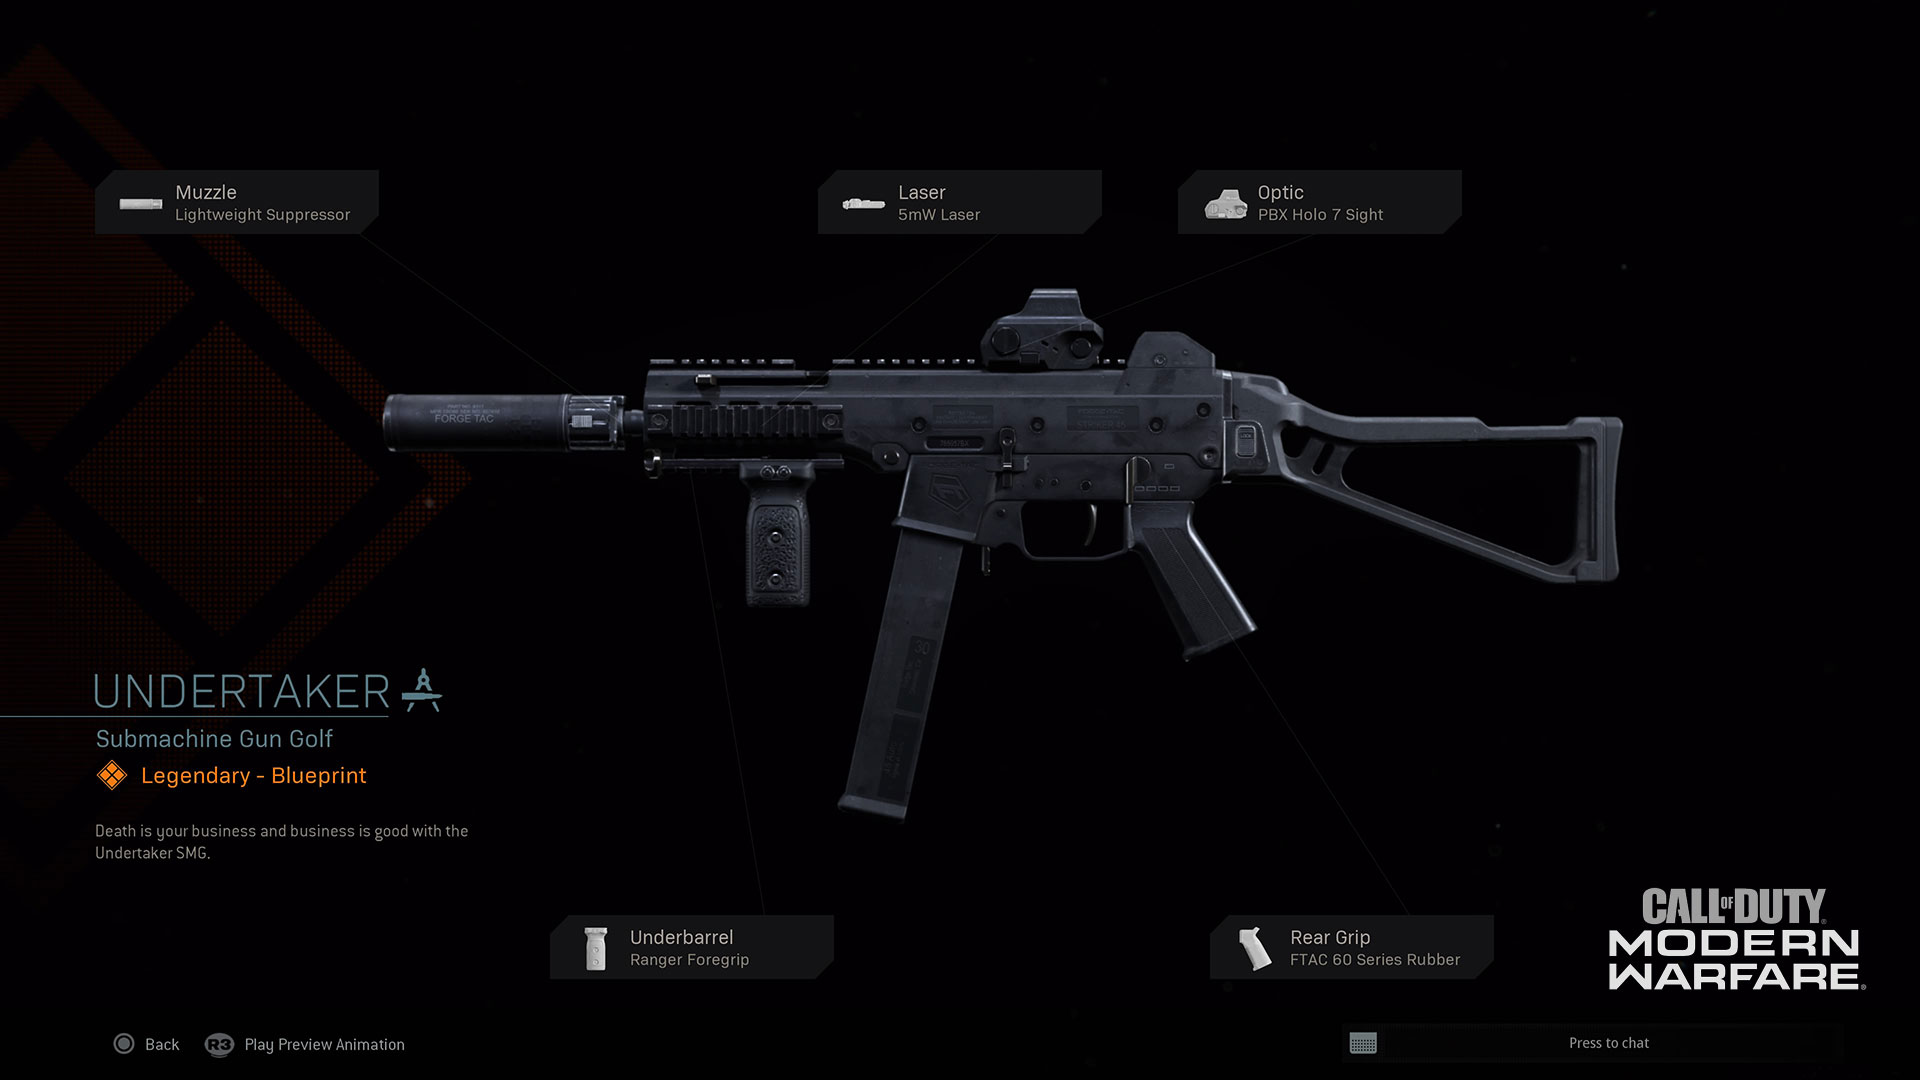
Speaking of Tier 100, the weapon both these Operators are holding – the Undertaker – is a Legendary blueprint of the Striker-45 unlocked at that tier as well.
This version of the SMG is kitted for phenomenal accuracy through its Ranger Foregrip and FTAC 60 Series Rubber Rear Grip. That, combined with a PBX Holo 7 Sight, allows for clear and accurate shots, even with sustained fire at a distance.
The enemy also won’t hear you coming with an attached Lightweight Suppressor, and if the action gets up close and personal, a 5mW Laser is there to provide a big reduction to hip fire spread. In total, this is an all-around awesome blueprint that will help you handle a variety of combat situations.
The Undertaker will come in handy when finishing out those Officer Rank Challenges, too: if you haven’t been gaining enough progress on those 400 SMG Kills, now is the time to pump up those rookie numbers, kid.
That brings us to the major topic of this week’s Rank Up Report: the second half of the Season Two ribbons. By now, you might be at Rank 155 and have full access to all these challenges like I do. At the moment, I’m wrapping up the last of my ribbons before the end of the season:
Like the first 50 ribbons, some are easier than others, such as winning 7 games of Team Deathmatch or using 40 Field Upgrades.
However, I’ve identified the 10 that may be the hardest to complete, so that those who are struggling to fill that Season Two ribbon box to 100% can push through and gain this serious point of pride.
Challenge: Throwing Knife – Get 40 Throwing Knife kills (Rank 112, 9,000 XP)
Pinpoint accuracy, and knowing the laws of physics, is key for this challenge. If you have difficulty landing Throwing Knife kills, try getting closer to the enemy where there is less of an arc to deal with, and leading your throw to where they are moving, if they happen to be running in a certain direction.
By the way, having a Throwing Knife equipped allows for one-hit melee kills, allowing you to chase the Close and Personal challenge (get 75 melee kills) that is unlocked a few ranks after this one.
Challenge: Resistance – Get 5 Kills while defending an objective without dying (Rank 117 – 1,500 XP)
The XP reward may not be massive, but make no mistake: this is a hard challenge.
All objectives count for the defense part of this challenge, including flags in Ground War. Try heading into one of these massive games and sniping from a flag with great sightlines, such as the D flag in Aniyah Palace.
Be patient, reposition if necessary, and pick off attackers to get this challenge done… And maybe win a few Ground War games while you’re playing the objective!
Challenge: Precision Airstrike - Call in the Precision Airstrike Killstreak 20 time(s) (Rank 121 – 6,000 XP)
Unfortunately, the Cluster Strike gets less love through these challenges, as a few rows down, its own ribbon only requires you to earn two of them. And I believe it needs virtual justice.
#StrikefortheClusterStrike
Anyways, whether you are trying to earn a Precision Airstrike or Cluster Strike, try building up to them using the Personal Radar and UAV, which both give you intel that can help you earn those five kills in one life.
On top of that, try using Hardline to reduce the cost of those killstreaks by one, or Pointman to have your objective play count towards earning them.
Challenge: Merciless Killer I – Get 10 kills without dying 3 times (Rank 127 – 9,000 XP)
A wise man – my boss – taught me a one-word philosophy that helped me gain longer killstreaks and made me a smarter player: Zen. In a fast-paced game of Call of Duty®, sometimes, taking a moment to breathe and relax can help you make better decisions that leads to a longer in-game life.
Taking that additional second to listen for enemy footsteps, heal back to full health, or wait for a teammate to ‘round the corner before you do could be the difference between life and death.
In other words, play smart, stay calm, use recon Killstreaks like the UAV, and that 10 killstreak will come in no time.
Challenge: Helo Support – Call in the Helo Support Killstreak 3 times (Rank 130, 9,000 XP)
Kill Chain, which is now in the Perk 1 slot, will help you tremendously when trying to get Helo Support Killstreaks, which require an 11 killstreak in order to use.
First, if you have friends that can run UAVs and make callouts, call them up and get a squad rolling to chase down these killstreaks. If you have these friends, or really nice random teammates, go with a Killstreak set-up that includes the Support Helo, a 5 Killstreak (your choice of Cluster Strike, Precision Airstrike, or Cruise Missile), and the VTOL Jet at 8 Kills.
If you don’t have people to run with, swap the VTOL Jet for the UAV if you are less confident, or use the UAV in place of a 5 Killstreak reward if you can manage four more loadout kills after throwing that drone up into the sky.
Challenge: Snack Attack – Kill 2 or more enemies with a single piece of lethal equipment 3 times (Rank 131 – 3,000 XP)
Although proximity-based equipment is great, you are probably better off using a grenade or another thrown explosive, such as C4.
One idea is to throw a C4 into a room where snipers congregate, such as the Office within Shoot House, or another high-traffic interior space, then blow it up in mid-air by tapping your reload command twice.
No matter how you want to chase those Snack Attacks, the Restock perk will be your friend, as it replenishes equipment every 25 seconds.
Challenge: Fury Killer – Use the Quick Fix perk and get 2 kills while injured without dying 1 time (Rank 138, 1,500 XP)
Quick Fix begins the health regeneration cycle as soon as you kill an enemy. Knowing this, try using an aggressive loadout – one with an SMG or shotgun primary – and throw yourself into close-quarters situations.
You are bound to get injured during a fight up-close, and that health regeneration buff will allow you to jump into another one quickly. The challenge will be completed as soon as you do exactly that.
Challenge: Recon Drone – Mark 75 Enemies using the Recon Drone Field Upgrade (Rank 145, 9,000 XP)
Remember: marking the same enemy twice doesn’t count as two tallies towards this challenge.
A potentially easy way to do this challenge is to play Ground War, or even a few matches of Plunder within Warzone, and go on a tagging spree with a boosted Field Upgrade earn rate with the Tune Up perk.
Then, once that drone is in the air, tag anything and everything with a pulse to knock this challenge out.
Challenge: All Clear – Destroy 20 pieces of Enemy Equipment (Rank 152, 6,000 XP)
This was one of the last ones I chased – besides the ones I had yet to complete at the time of writing – which may be a great thing, as this means I’m running into less Proximity Mines in Multiplayer.
I used the Spotter perk to sniff out enemy equipment, and an LMG with FMJ to destroy them through walls, if getting around to them was going to put me in danger.
You may also complete this challenge while playing Warzone, as survivalists may used proximity-based explosives to defend a house or other interior space from intruders.
Challenge: Four Piece Dinner I – Earn 1 Four Piece Medal (4 uninterrupted kills in the kill feed) (Max Rank, 1,500 XP)
Are you still chasing the Tetrad Master challenge? Good, because this is how you hit two birds with one stone.
The final Officer challenge involves getting four interrupted kills in the kill feed. Here’s the advice I had for that challenge in that Rank Up Report:
While a weapon with a ton of ammo in a single mag can do well, high-end Killstreaks like the VTOL Jet – and wouldn’t you know it, the challenge before this one is to earn one of these bad boys – Chopper Gunner and Gunship can wipe teams out quickly. Earn one of those streaks, and you may take four enemies down quick enough to count for a Quad Kill.
Have fun completing the rest of these ribbon challenges, and be sure to show off that sick emblem for completing it all! You deserve it; after all, you proved your prowess with a variety of weapons, perks, Killstreaks, and combat situations across Modern Warfare®.
And with that all said, I’ll see you online. Stay frosty.
For more information and the latest intel on Warzone, visit www.callofduty.comand follow @CallofDuty on Twitter, Instagram, and Facebook.
For more information and the latest intel on Call of Duty®: Modern Warfare®, check out: www.callofduty.com,www.youtube.com/callofdutyand follow @InfinityWard and @CallofDuty on Twitter and Instagram and Facebook.
© 2019-2020 Activision Publishing, Inc. Activision, Call of Duty, and Modern Warfare are trademarks of Activision Publishing, Inc. All other trademarks and trade names are the properties of their respective owners.
For more information on Activision games, follow @Activision on Twitter, Facebook, and Instagram.